Threathunting I: Network setup
Introduction
This is a small series I wanted to start, where I write about my small threathunting setup and describe a little what I build and what I am doing with it.
In this part, I will describe the Network setup for my Environment, more about how I build the honeypots and the ELK Server I will describe in the follow up articles about threathunting.
Keep in mind this is for Education and fun, no serious stuff going on here.
Why I Built a Home Lab for Threat Hunting 🕵
The threat landscape is constantly evolving, with new attack vectors, tools, and tactics appearing almost daily.
And to keep my skills current with real-world threats, I built a home lab dedicated to threat hunting. This environment allows me to safely observe attacks and develop detection and defense methods. I deployed web and shell honeypots, and collect real threat data in a controlled setting.
It’s a practical, hands-on way to explore the behavior of adversaries and its a lot of fun!
Network Setup
Topology, Hardware and Tools 🛠
For the hardware setup, I kept things lightweight and affordable by using Raspberry Pi devices and open-source tools. The honeypot is based on the well-known Cowrie SSH honeypot and the honeyhttpd HTTP honeypot . It runs on a Raspberry Pi 4 with 8GB of RAM, hosted inside a Docker 🐳 container. On the honeypot host, Filebeat is running to ingest the Cowrie logs into the ELK stack.
For the ELK stack, I used a Raspberry Pi 5 with 16GB of RAM, running Debian. The ELK services are also containerized using Docker. The stack is based on the DShield-SIEM project, which I customized to better fit my needs. I’ll dive deeper into those modifications and the ELK setup in a follow-up article.
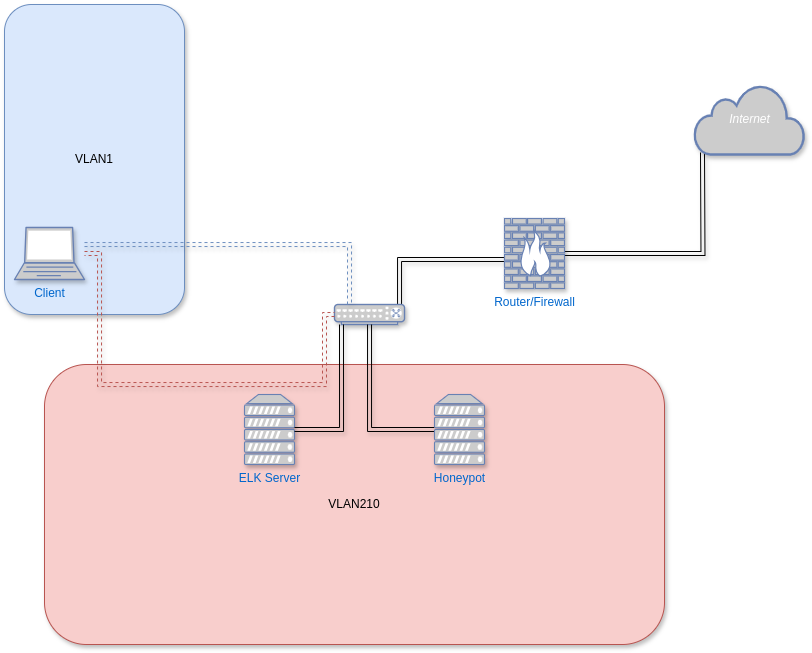
The network topology is straightforward but deliberately segmented. The router is connected to a managed switch, which is responsible for handling VLAN separation. Both the honeypot and the ELK server are connected to this switch and are placed in an isolated VLAN (VLAN210). This VLAN is dedicated exclusively to threat hunting, ensuring that any potentially malicious traffic remains fully contained and cannot interfere with the rest of the home network.
My client system 💻 is the only machine allowed to connect from outside the VLAN to both the ELK server and the honeypot. This connection is strictly for maintenance and administrative purposes. The ELK server is allowed to access the internet, primarily to pull threat intelligence data from external sources and security feeds.
In contrast, the honeypot is completely blocked from internet access, with the exception of SSH and HTTP traffic going in and out of it. These are the only services deliberately exposed to simulate vulnerable endpoints. Communication between the honeypot and the ELK server is allowed for log ingestion and analysis. However, I intend to introduce stricter controls on this internal traffic in the future to further reduce the attack surface.
Firewall configuration🧱
For the pf(1) configuration It was as always with UNIX fairly easy to get to work:
match in quick log on egress proto tcp from any to any port 22 flags S/SA rdr-to $honeypot port 2222
match in quick log on egress proto tcp from any to any port 443 flags S/SA rdr-to $honeypot port 4433
This rule makes sure any incoming TCP connection attempt to port 22 (SSH) and port 443 (HTTPS) is immediately intercepted, logged, and transparently redirected to the $honeypot server listening on port 2222 or 4433 for HTTPS Traffic.
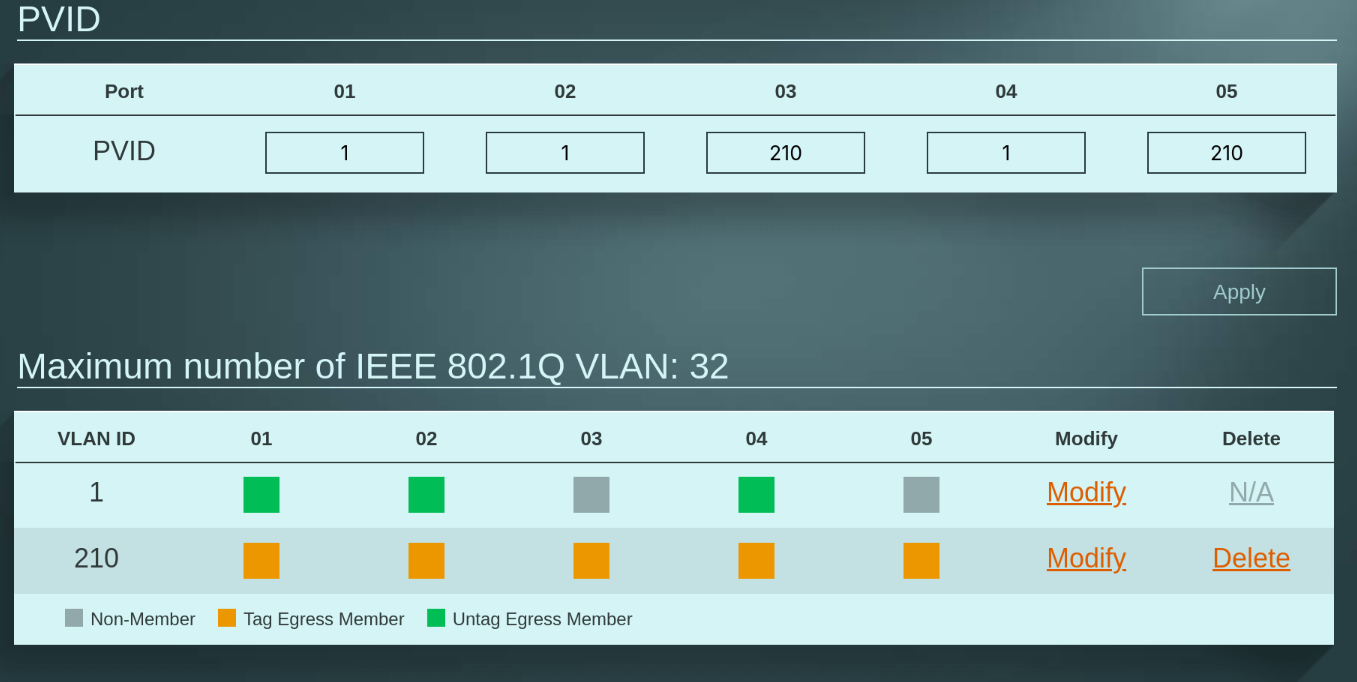
Switch configuration
Here you can see my managed switch configuration. Port 5 (honeypot) and port 3 (ELK) is assigned to VLAN210, port 2 is the router it needs to talk into both networks and at port 1 is my workstation to access the theathunting environment.
What I Learned
Building and maintaining this lightweight honeypot and monitoring setup on Raspberry Pi devices has been an insightful experience. Here are some key takeaways:
Resource Efficiency: Raspberry Pis provide a surprisingly capable platform for running complex services like Cowrie honeypot and the ELK stack in Docker containers, keeping costs and power consumption low.
Network Segmentation Matters: Isolating the honeypot and ELK server in a dedicated VLAN (VLAN210) effectively contains malicious traffic, protecting the rest of the home network from potential threats.
Controlled Access Is Crucial: Restricting external access to only authorized clients and limiting the honeypot’s internet connectivity reduces the attack surface while still enabling useful data collection.
Logging and Data Collection: Using Filebeat to ship logs from the honeypot to the ELK stack provides real-time visibility into attacker behavior, which is essential for threat hunting and incident response.
Customization Pays Off: Adapting existing tools and SIEM projects (like DShield) to specific needs improves effectiveness and allows for tailored threat detection.
Future Improvements: There is always room to tighten internal communication rules and harden the setup further to minimize risk and improve operational security.
This project highlights the balance between practical constraints and security needs, demonstrating that even modest hardware can contribute significantly to threat intelligence and network defense.
I drew inspiration for this setup from the DShield SIEM project by SANS and would like to express my gratitude for their valuable work.
Whats next
Next I had to build the ssh honeypot and the HTTP Honeypot, stay tuned for the follow up!